

Halloween is just around the corner so I thought that I would take the time to upload a tutorial for you and give you one last idea of a look that you could do...
QUICK WARNING - THIS POST IS VERY LONG
As I said on Tuesday, I am going to upload a more gruesome tutorial, contrasting the cuter tutorial I uploaded then.
This tutorial will be using some SFX so if you don't have these then you can always use alternatives, but these are very cheap and easy to get hold of.
Firstly, I am taking an old sponge and some liquid latex. Make sure to use an old and dirty sponge for this to get the rough texture, but also because the latex is going to ruin the sponge.
I am bouncing this across the two parts of my face where I want ether a cut or a graze.


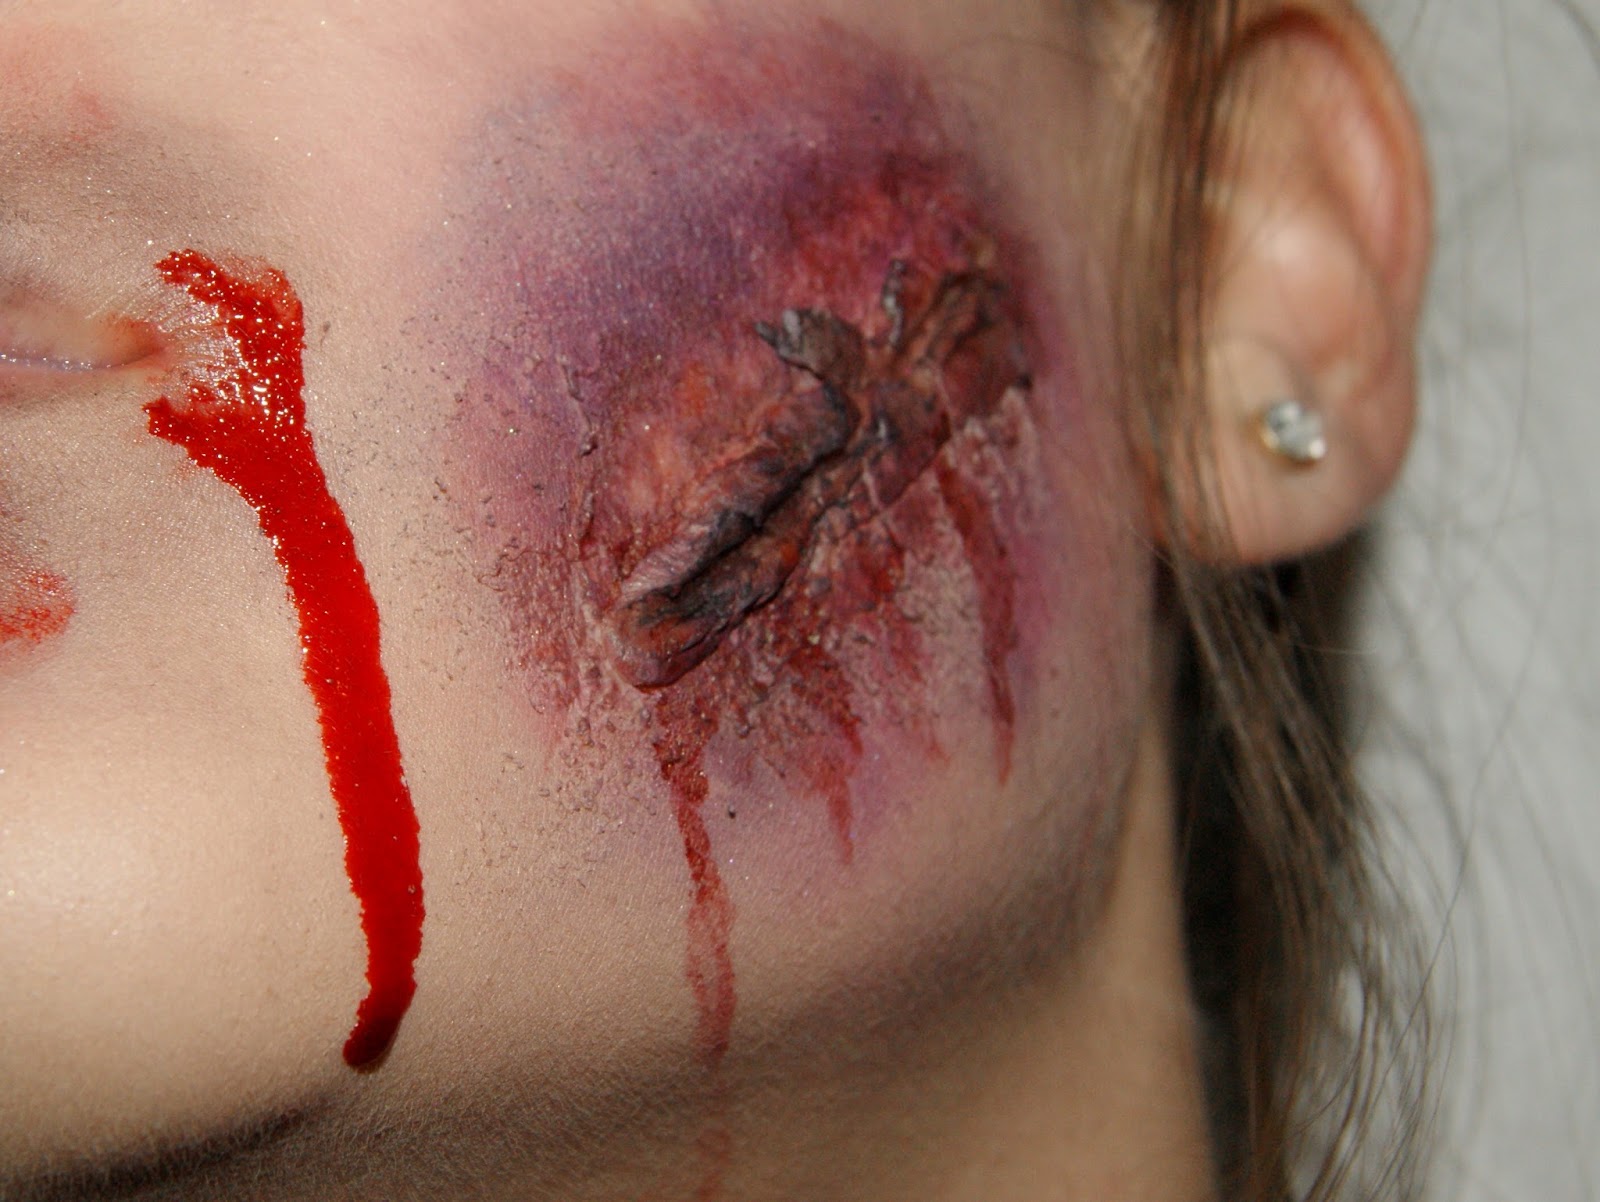
Next, I took out some scar wax and moulded it into the shape I wanted. I chose a long and quite thin shape for the shape of the cut.
Also, I used a cotton bud to apply some latex around the edges and stick the wax down.

I then waited for the latex to dry a little and smoothed down the edges of the scar wax slightly. This is going to help it blend into my own skin a little more than it was.

Next, I am taking a beauty blender and my regular foundation, which is the Revlon Colorstay foundation. I am bouncing this all over my skin to cover any imperfections and make sure that all my skin is one shade.
I also took the foundation over the scar wax to again help it blend into my skin better.

Now I am taking a brown and purple eyeshadow on a fluffy synthetic brush and blending it over the scar wax. This is going to create a bruising illusion around it.

I am now using a purple and red face paint over top of the eyeshadow with the same synthetic brush. This is going to intensify the bruising effect a lot.

Then I am taking the brown and purple eyeshadow over top again to add to the dimension but also tone down the face paint.

Next, I took a pair of blunt scissors, emphasis on the word blunt, and cut a line along the scar wax. Make sure not to cut your face!

I am applying a black face paint inside the cut with a small angled brush to create the depth inside the wound.

To add to this depth I am using a black eyeshadow over top and blending it out over the edges of the cut, onto the rest of the scar wax.

To finish of the cut I am adding some stage blood in and around it, which is going to add to the gruesome look. I applying this with a brush and blending out the edges slightly with my finger.

Lastly, I am dragging some of the blood down below the cut to give the illusion of the blood dripping down and spilling out of the wound.

Moving back to the graze, I am applying the same brown and purple shades that I used for the cut to again create bruising. This is also going to emphasise the uneven texture of the latex underneath.

Now to finish off the graze, I am taking some of the stage blood on my finger tips and dabbing it over the latex and bruising. This is going to emphasise the graze and just make it look more realistic.

Next, I am adding some concealer, which is the Rimmel Wake Me Up in Ivory. This is just going on any imperfections that the foundation didn't cover and cover them up.

I am now powdering my face to keep the foundation and concealer in place. For this I am using the Maybelline Matte Maker as it is my favourite powder that I have used!

To finish off my face, I am contouring my face with the brown and grey from the Revolution Iconic 3 Palette. Obviously you can't get to all of your cheekbones, so just apply the contour to where you can see your cheekbones for that more sunken in and sculpted effect.

Moving onto eyeshadow, I am starting off with the Maybelline Colour Tattoo in On an On Bronze. I am just using this to prime my eyes and make sure that no eye shadows crease.

Through my crease, I am roughly applying a mixture of 'The Mail' and 'Boxed' from the Sleek Oh So Special Palette. This is going to add a bit of dimension back into my eye socket and blend out the other shades which I will be applying.

To darken up my eyes I took 'Noir' from the Sleek Oh So Special Palette on the Zoeva Petite Crease Brush. I applied this on the outer corner in a V-shape and taking it ever so slightly into the crease.

Then I blended the black under my eyes but with the Zoeva Soft Definer Brush so that it wasn't very precise and a bit messy.

I am now filling in my eyebrows with the Zoeva Wing Liner brush as it's very thin and can replicate hairs with the product I am using, with is the Rimmel Brow This Way Palette.

I filled my eyebrows normally as I usually would. However, I dragged the tail down a lot further then I usually would to make my brows look longer and bolder.


I am now taking a purple from the Sleek Oh So Special Palette on the same brush and using it to create veins coming down from my eyes. Also, I took my finger and beauty blender over top just to blend these into my skin a little more!

Also, I am doing this on my forehead and again blending the veins in with my beauty blender or fingers.

To add to the veins on the forehead, I decided to add some blood in the same sort of fashion. I dripped the stage blood down with a small brush, which I actually think may be a paint brush.

I decided to go in with the blood around my inner corners and drip in down again slightly.

Again with the blood, I just added a little around one of my nostrils.

Then I went back into the Sleek Palette and took the purple and brown again. I blended it around and over my lips to create a bruised effect, making sure to focus the main colour on the centre of my lips.

Then back into the blood, I took some on my finger tips and patted it over my lips, adding some water to the edges to make it look as natural as possible.

I also dripped some down the side of my mouth to add to the effect.
That's it for the face!
Now I'm moving onto the vampire bites on the neck. I am taking the scar wax again and moulding it into the shape I want. Again, I stuck it on with latex like I showed before with the cut on my face.

I then repeated this for the next mark underneath!

Now, I am creating the teeth holes in them both using an eyeliner pencil from Missy Sporty in 002 Solid. This is going to make the perfect shape but also create the depth of colour inside.

Then I am taking the purple and brown shades again to create a bruised and sore look to the edges.

I then used the synthetic brush to apply some blood around the wounds to give some more texture and a gruesomer look.

Lastly, I am using a smaller brush to apply blood spilling out for the wounds.

And then finally... that's it!


I hope that you enjoyed as this took me forever to write!
What are going as on Halloween?
India Jasmine
♥
No comments:
Post a Comment